Connect LINE OA
The LINE OA connection page walks you through 7 steps (0 to 6) on a computer, with your phone and its LINE app at hand. It takes about 15 minutes and saves every step, so you can close it and carry on later
What you need
A computer signed in to the venue's LINE Official Account Manager, with an account that is an admin of that OA
Your phone with LINE, to send a verification code and scan the test QR. This LINE account becomes the venue owner's
No LINE OA yet? Create one for free in LINE Official Account Manager, then start here
Open the LINE OA connection page
On a computer: once you reach the LINE step of Getting started, the “Getting started” card on Today shows “Next: Connect LINE OA”. Tap “Do it”

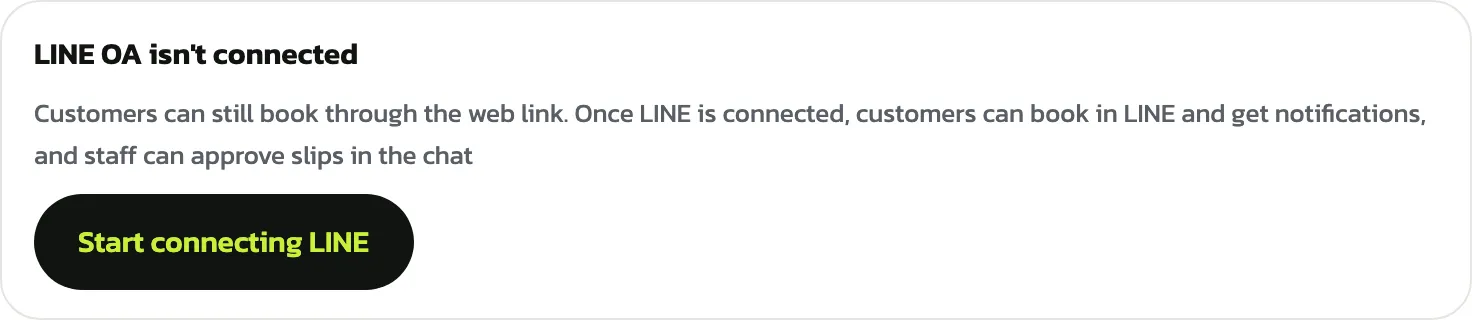
Or at any time, open “Settings and system” → “Connections”: it says “LINE OA isn't connected”. Tap “Start connecting LINE”
On the left are steps 0 to 6, the current one in light green. On the right is what to have ready
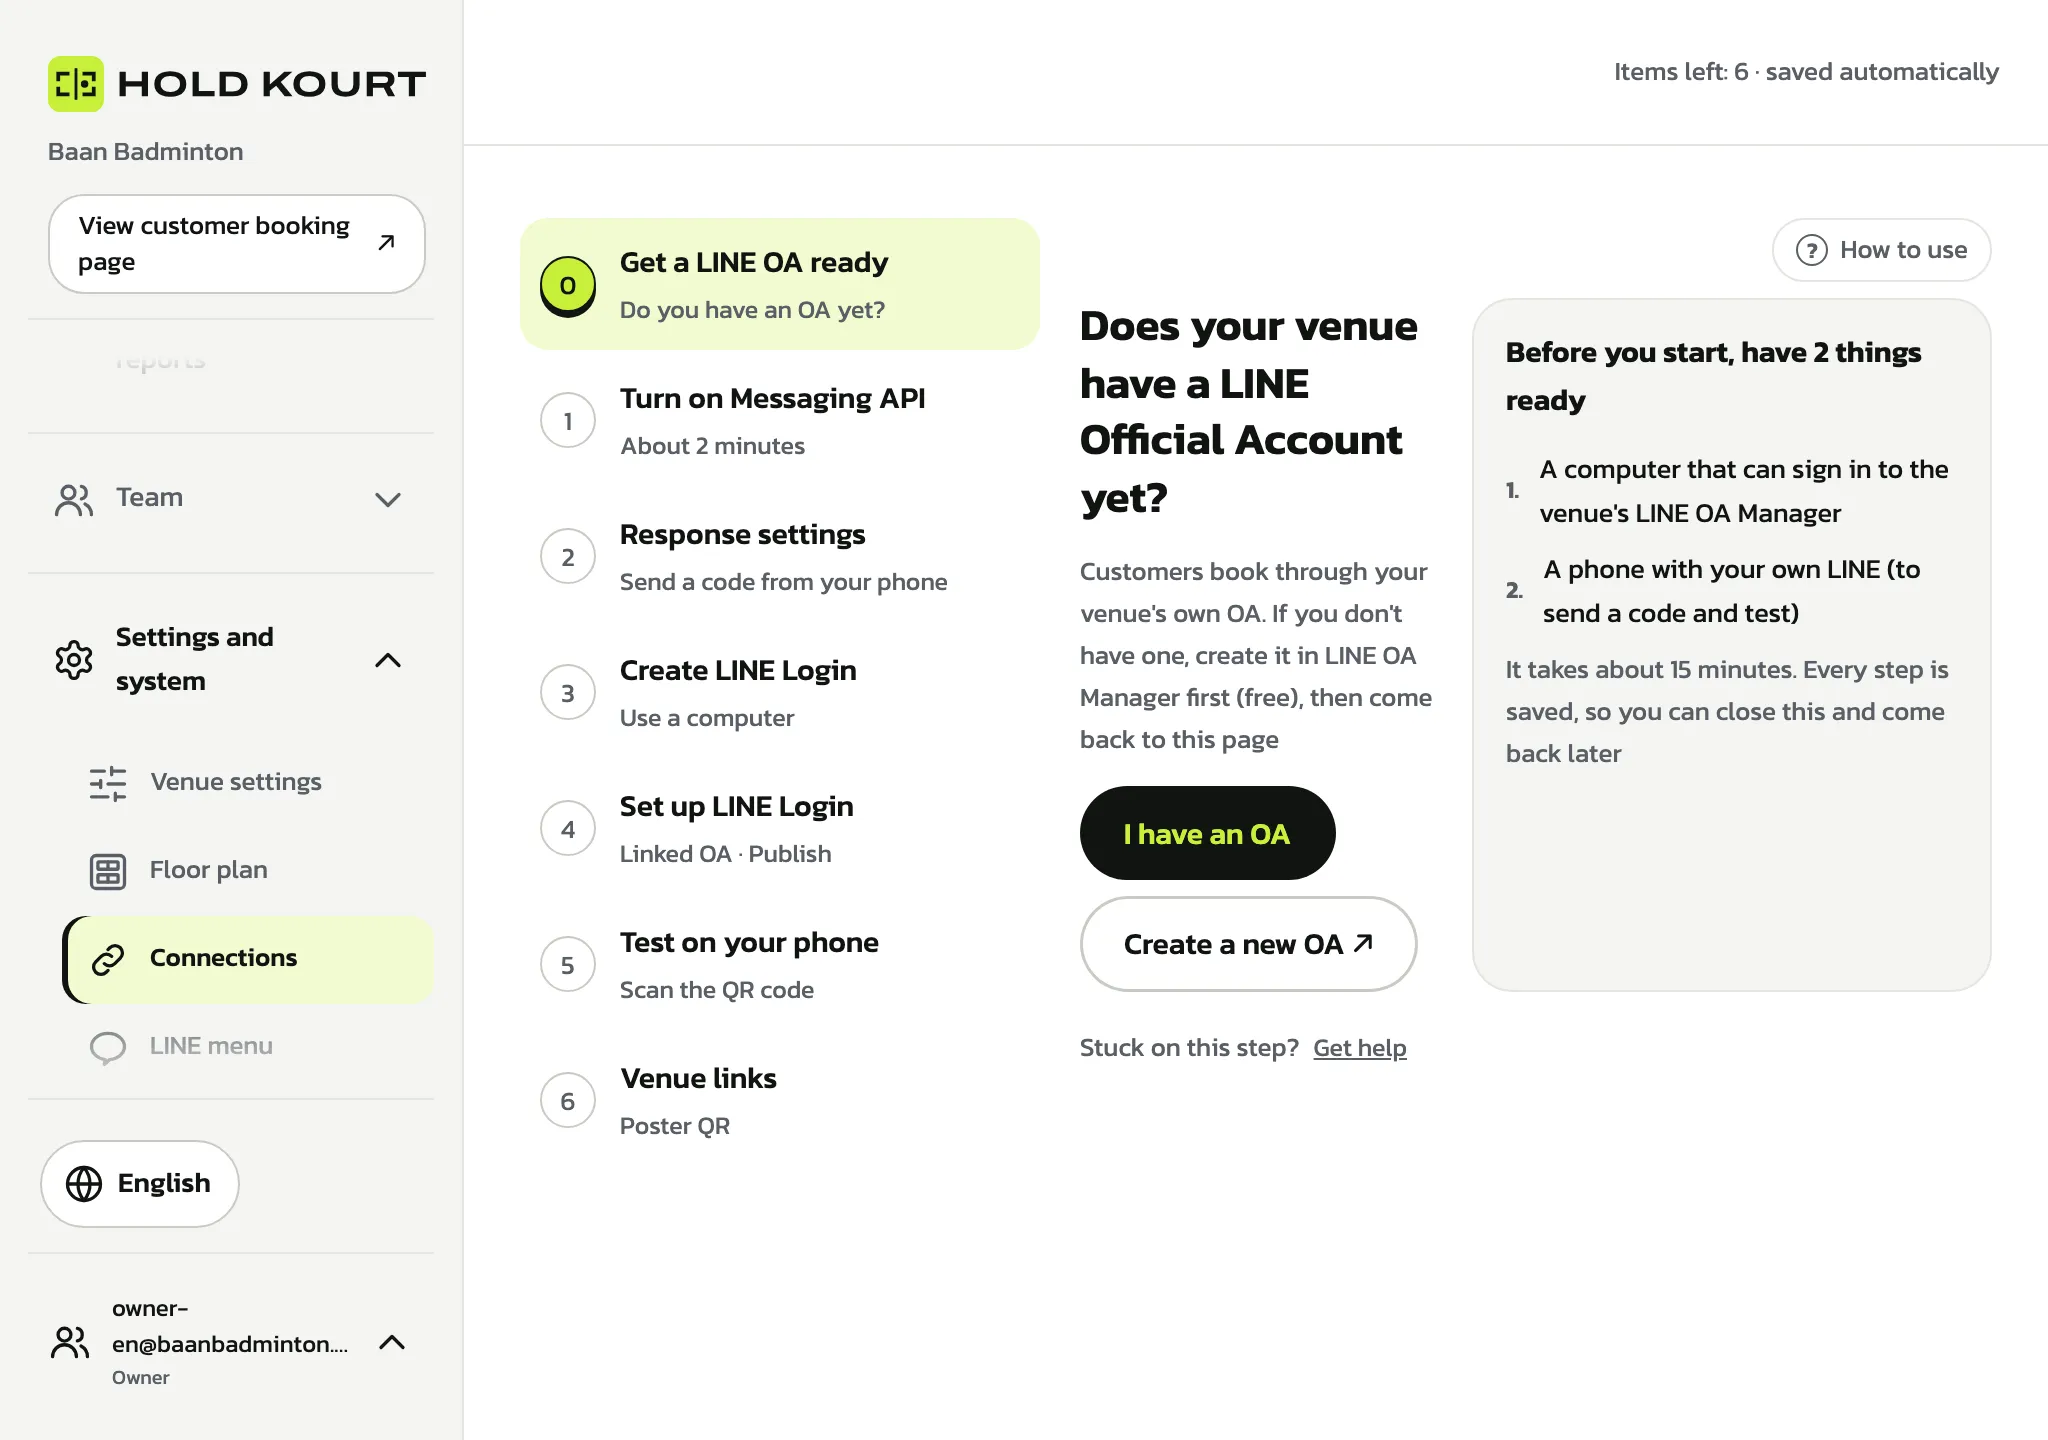
0. “Get a LINE OA ready”
If the venue has an OA, tap “I have an OA”. If not, “Create a new OA ↗” opens LINE Official Account Manager to create one (free); then come back to this page
1. “Turn on Messaging API”
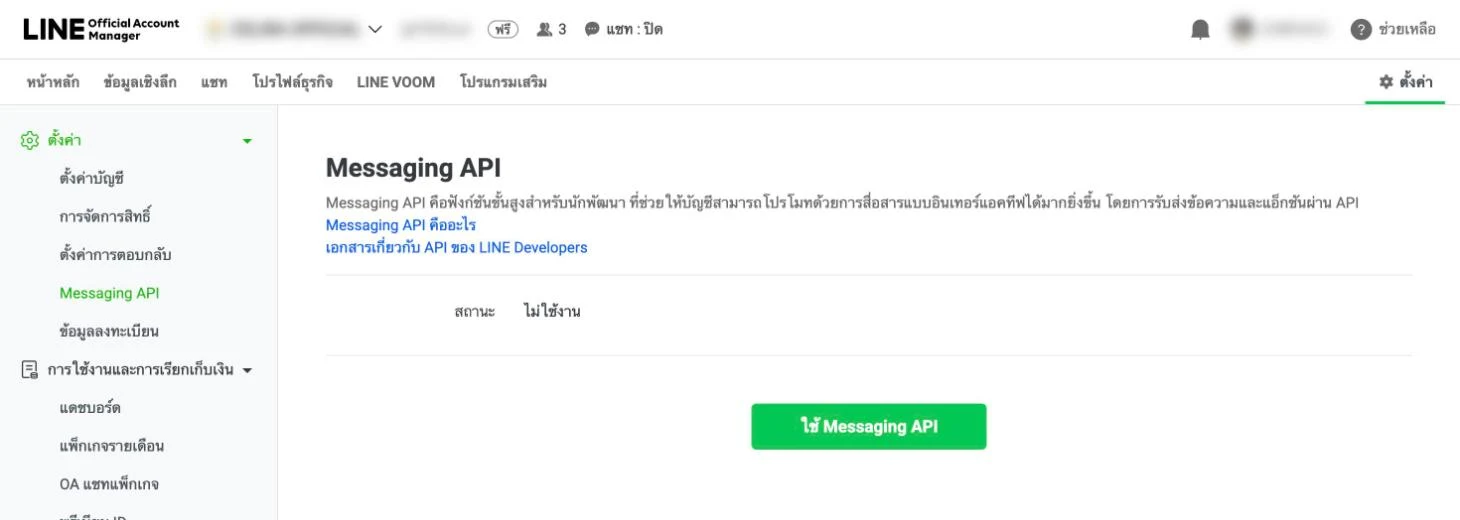
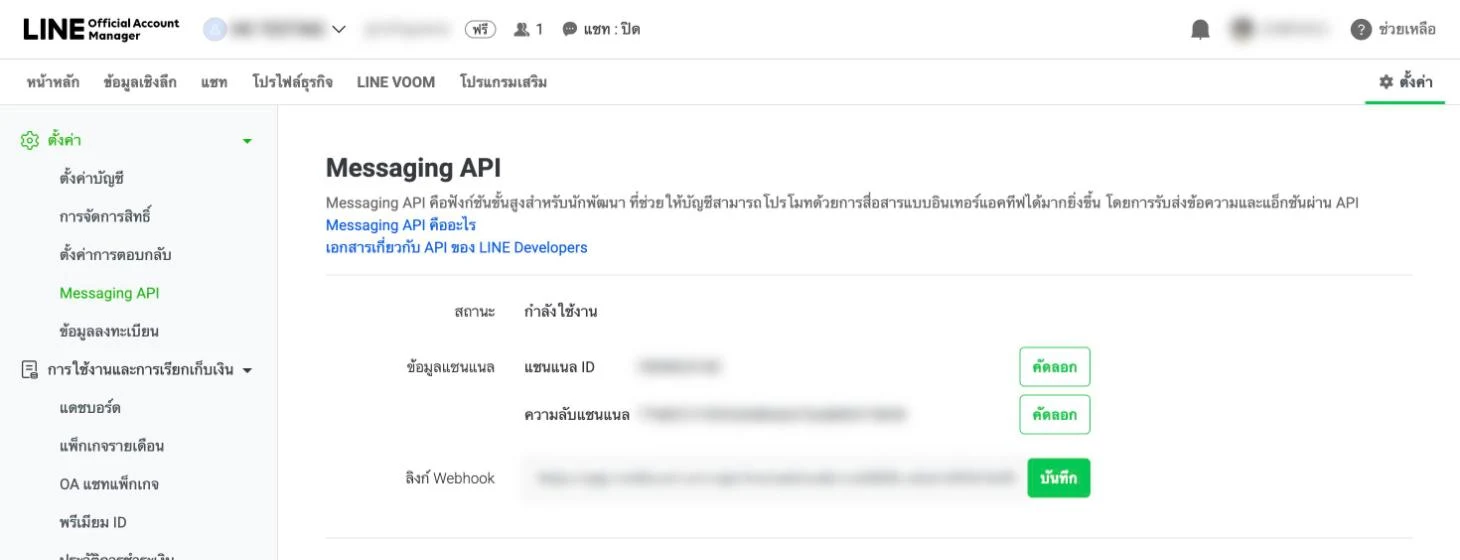
LINE Official Account Manager follows your LINE account's language; the pictures show it in Thai, with the English meaning of each Thai label given in brackets.
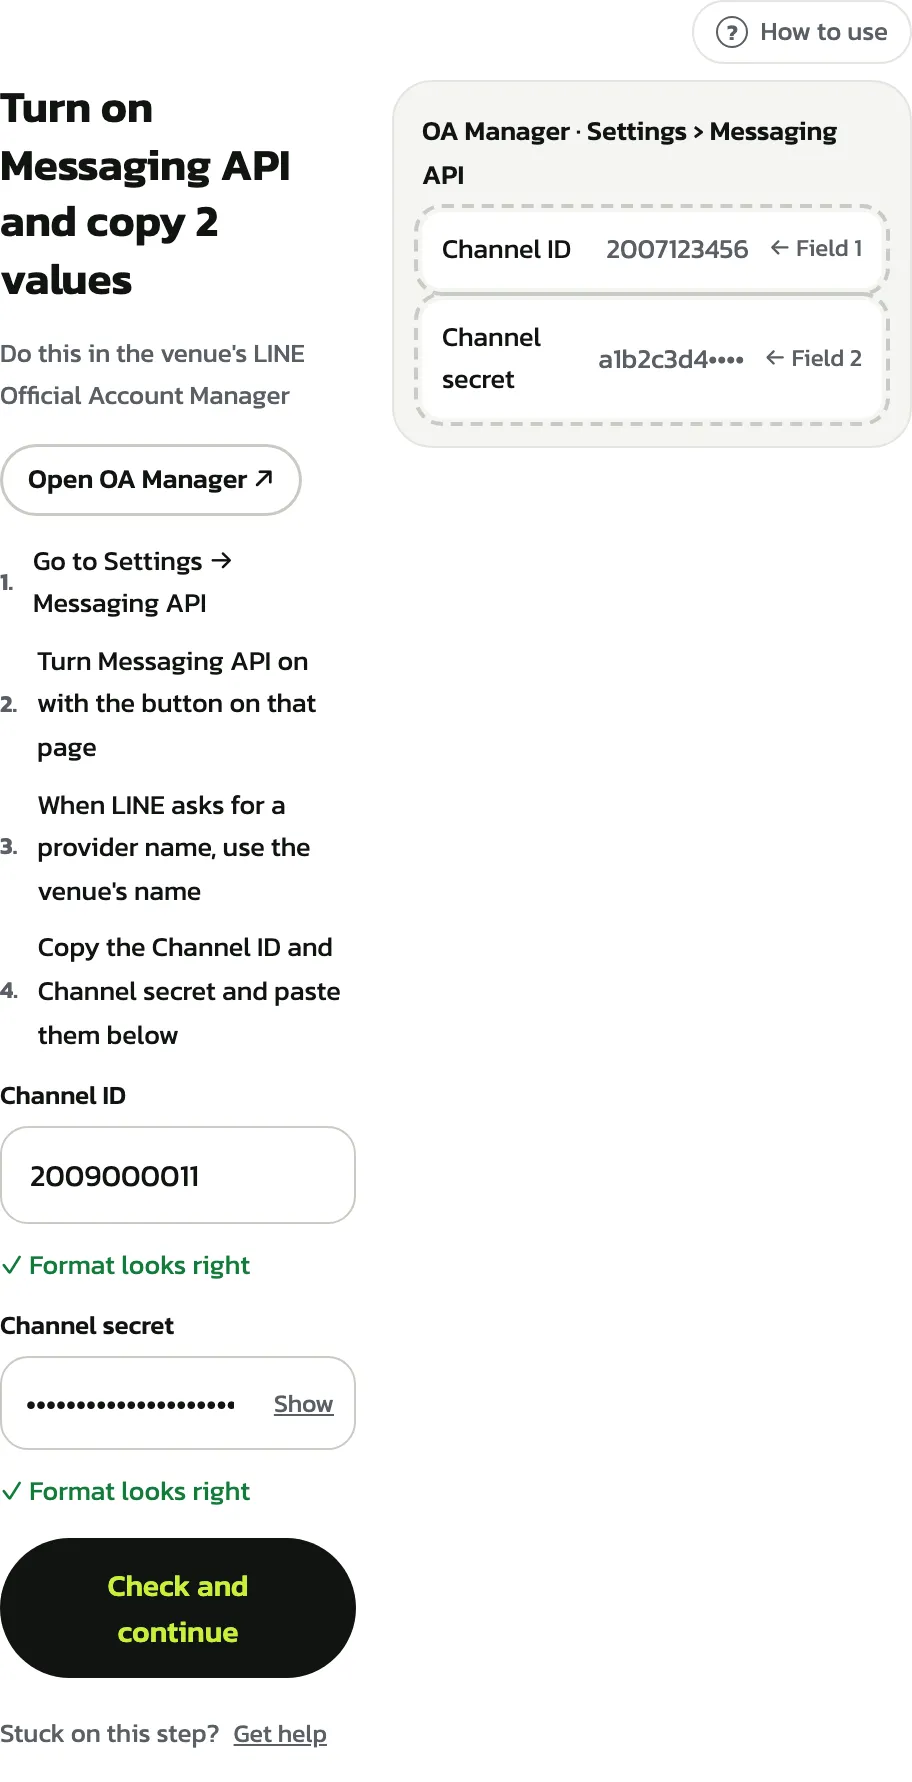
Tap “Open OA Manager ↗”, pick the venue's OA, tap “ตั้งค่า” (Settings) at the top right and “Messaging API” on the left. If the status says “ไม่ใช้งาน” (not in use), tap “ใช้ Messaging API” (use Messaging API). When LINE asks for a provider name, use your venue's name
Screenshot of LINE's website, Once it is on, the same page shows “แชนแนล ID” (Channel ID) and “ความลับแชนแนล” (Channel secret). Copy each with its “คัดลอก” (copy) button. Leave “ลิงก์ Webhook” (Webhook URL) alone: HOLD KOURT sets it when it connects
The Channel secret is the OA's password: never send or post it. HOLD KOURT stores it encrypted
Screenshot of LINE's website, Back on this page, paste them into “Channel ID” and “Channel secret” and tap “Check and continue”
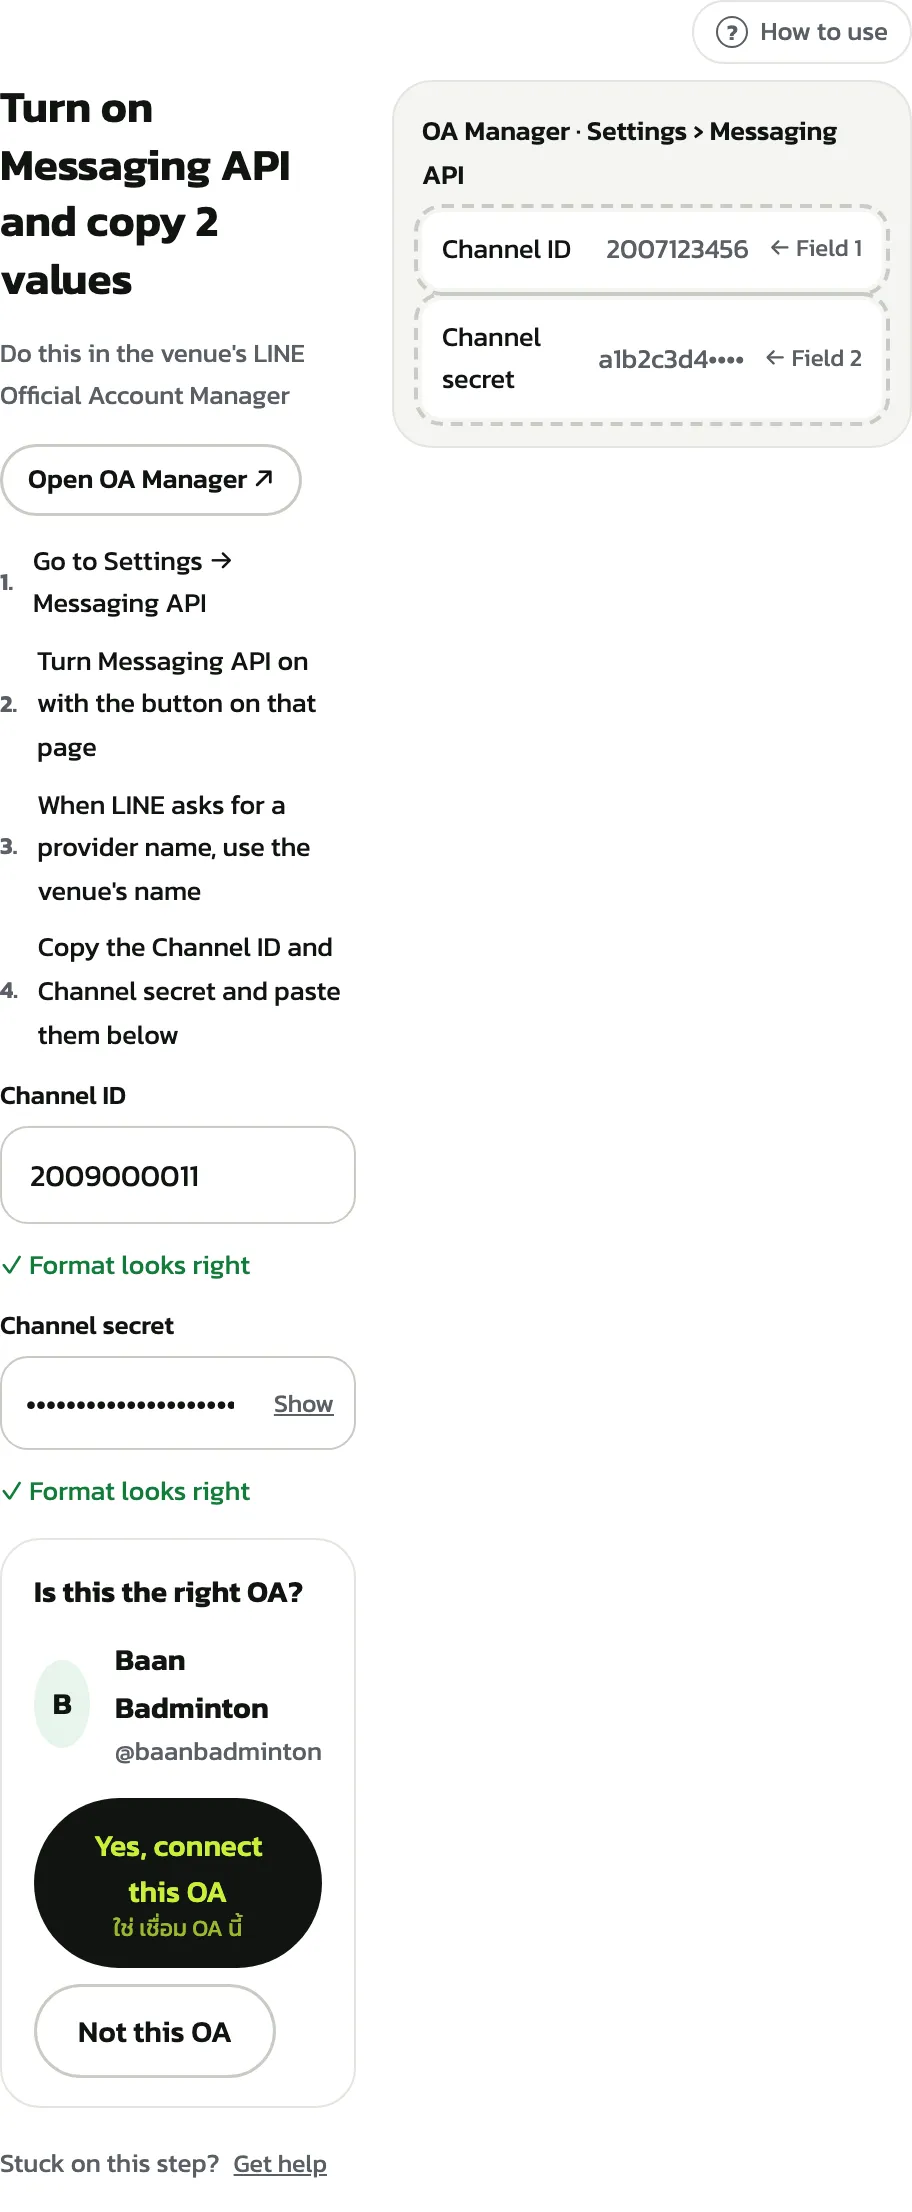
It asks “Is this the right OA?” with the OA's name and ID. If it is, tap “Yes, connect this OA”; if not, tap “Not this OA” and copy the values from the right OA
If the OA is connected to another system (a chatbot, say), you are warned first: LINE allows one system at a time, and the old one stops answering chats as soon as you connect HOLD KOURT
2. “Response settings”
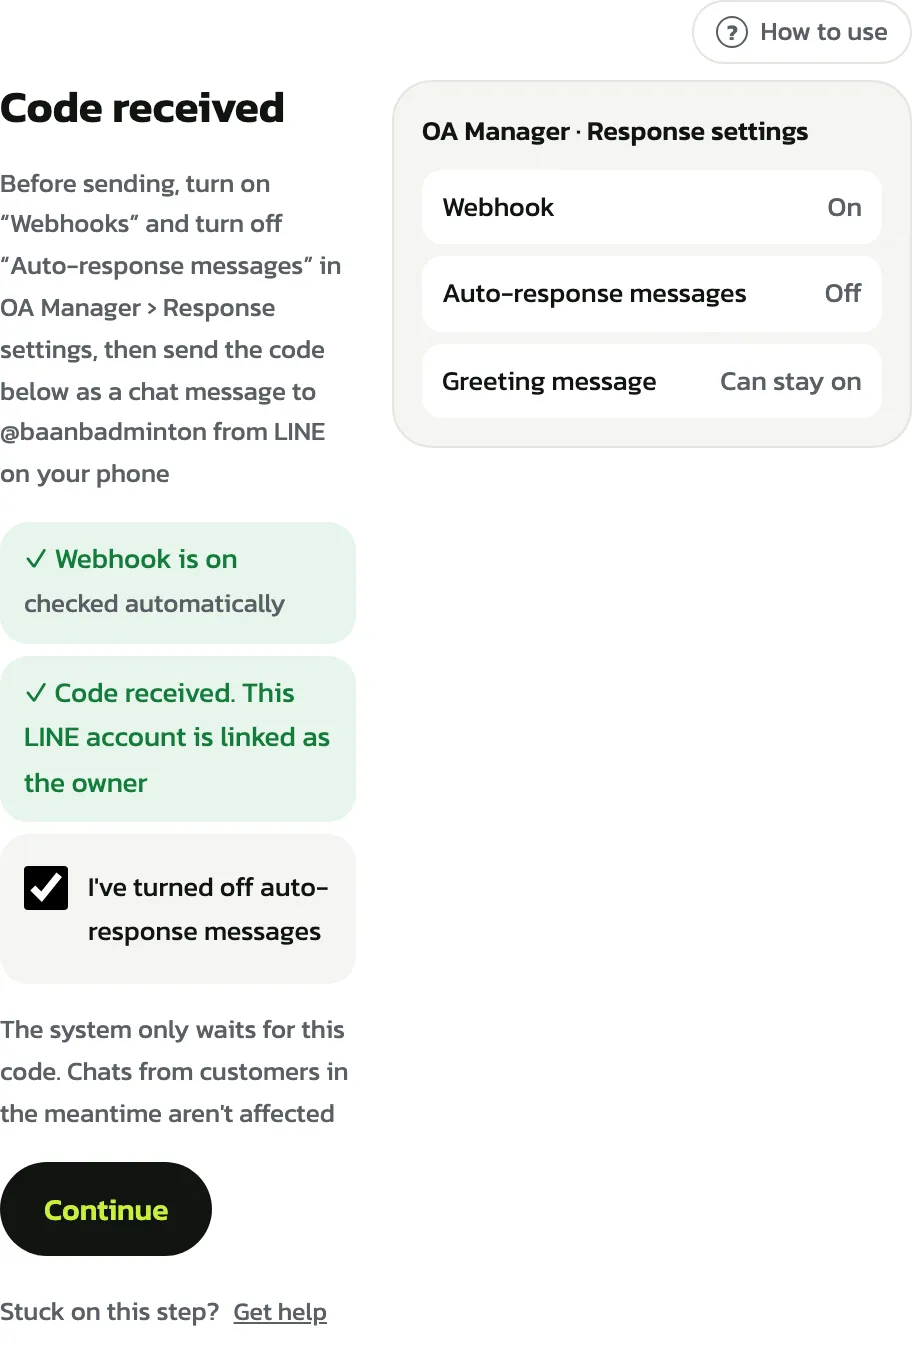
In OA Manager tap “ตั้งค่า” (Settings) → “ตั้งค่าการตอบกลับ” (Response settings). Turn “Webhook” on and “ข้อความตอบกลับอัตโนมัติ” (auto-response messages) off. “ข้อความทักทายเพื่อนใหม่” (greeting message) can stay on
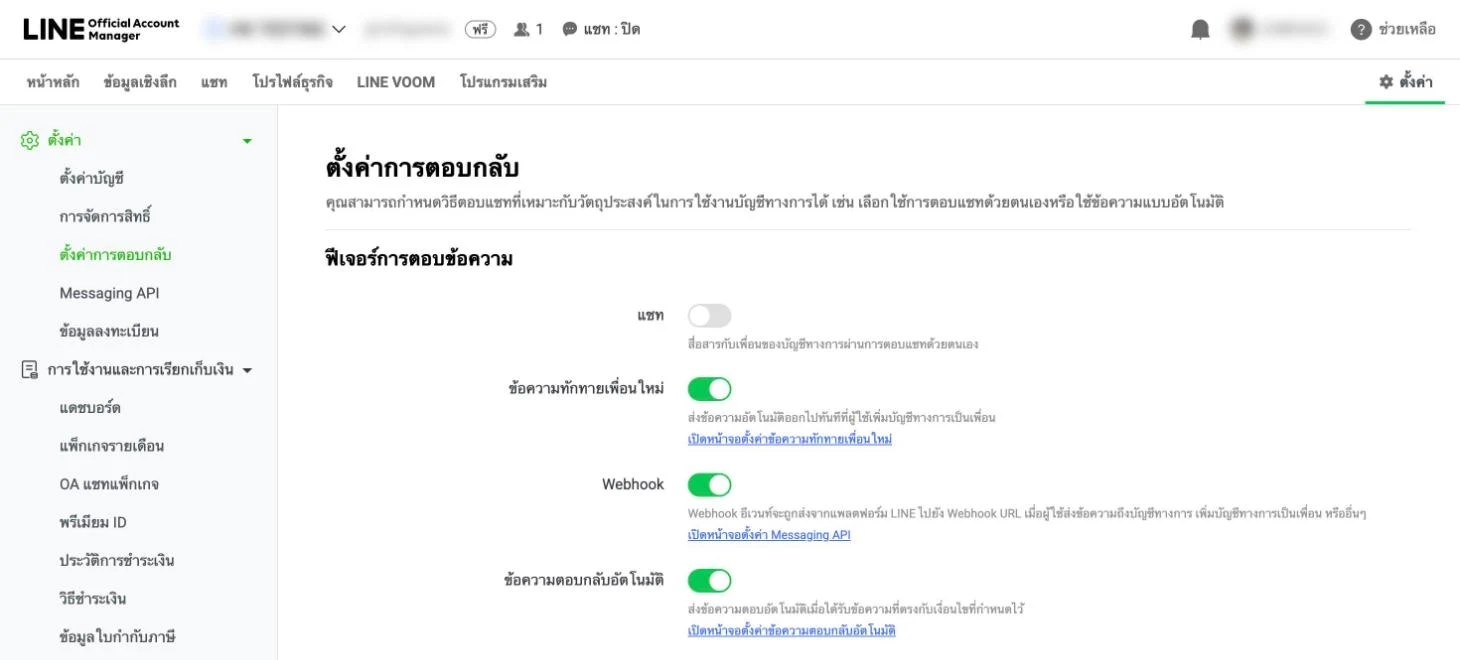
In this picture auto-response messages are still on: switch them offScreenshot of LINE's website, This page shows a 6-digit code and a QR. Scan the QR with your phone: LINE opens a chat with the venue's OA with the code typed in, so just send it. You can also type the code into the OA chat yourself. The code lasts 10 minutes; after that you can ask for a new one
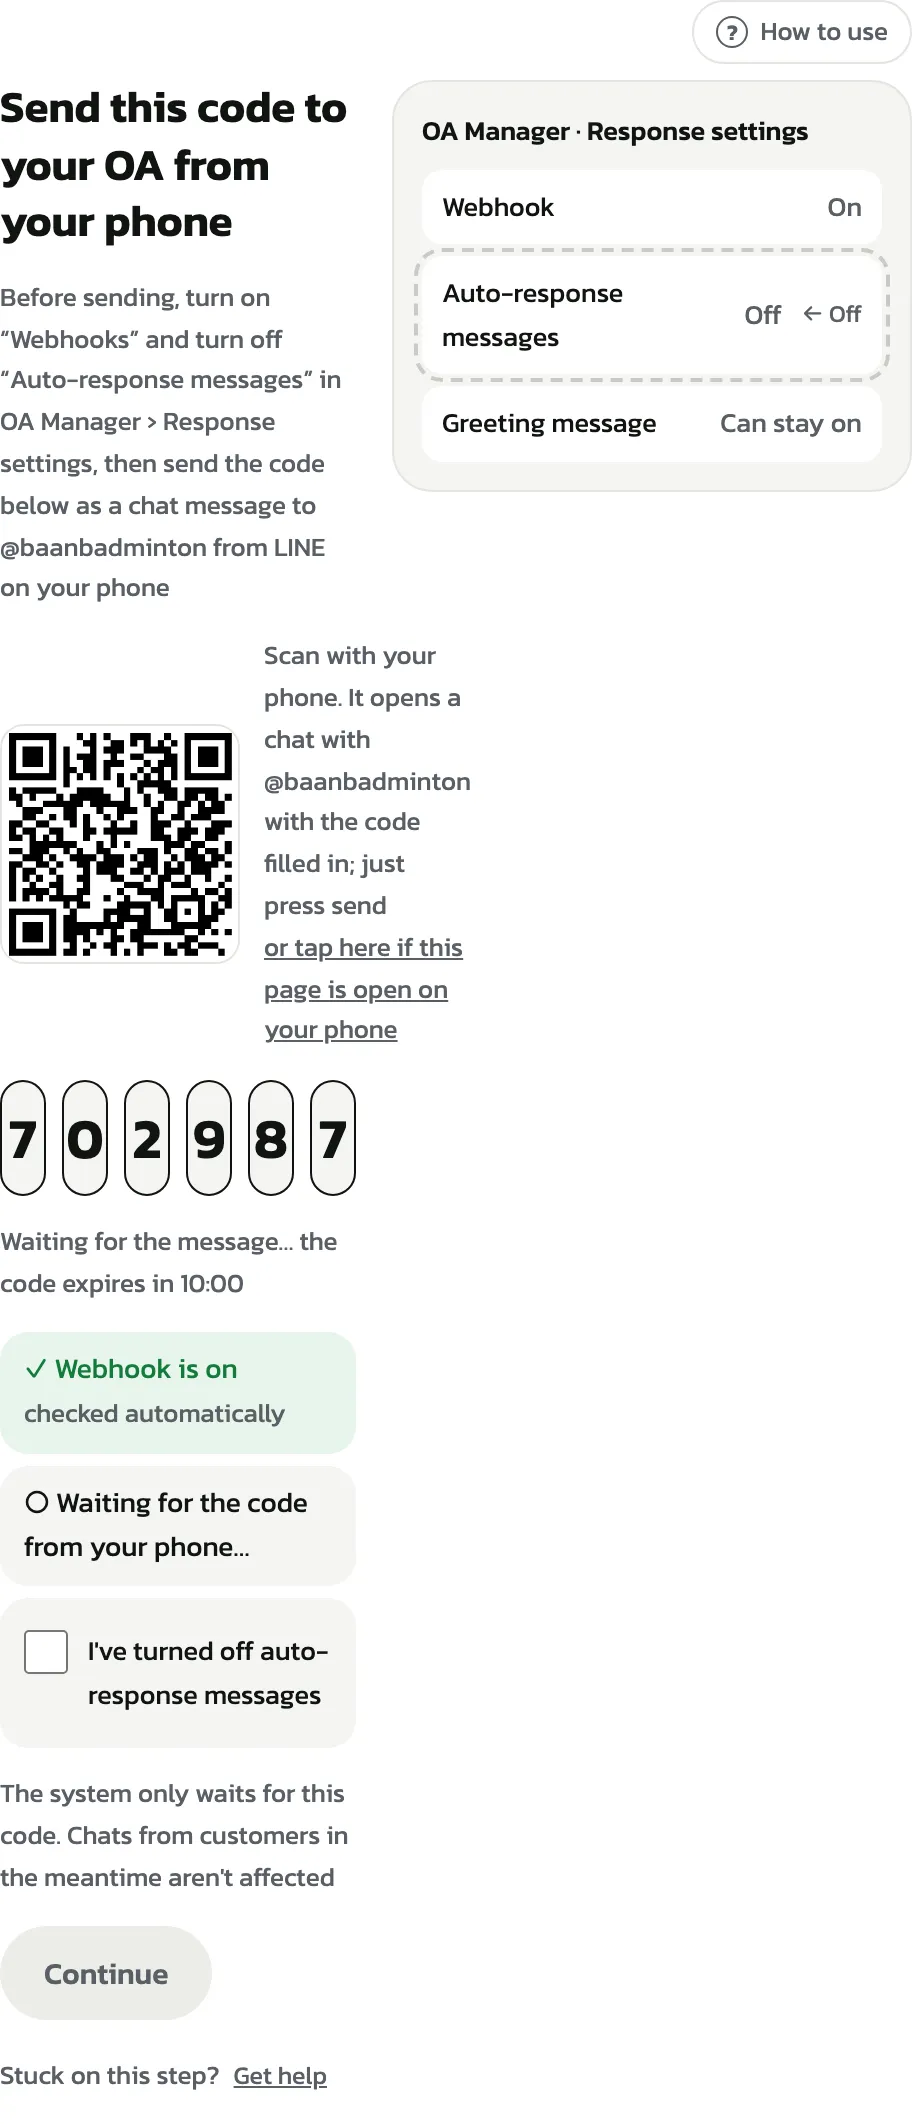
When the OA receives it, the page shows “✓ Code received. This LINE account is linked as the owner” by itself. Tick “I've turned off auto-response messages” and tap “Continue”
Only this code is waited for: customers chatting with the OA meanwhile are not affected
3. “Create LINE Login”
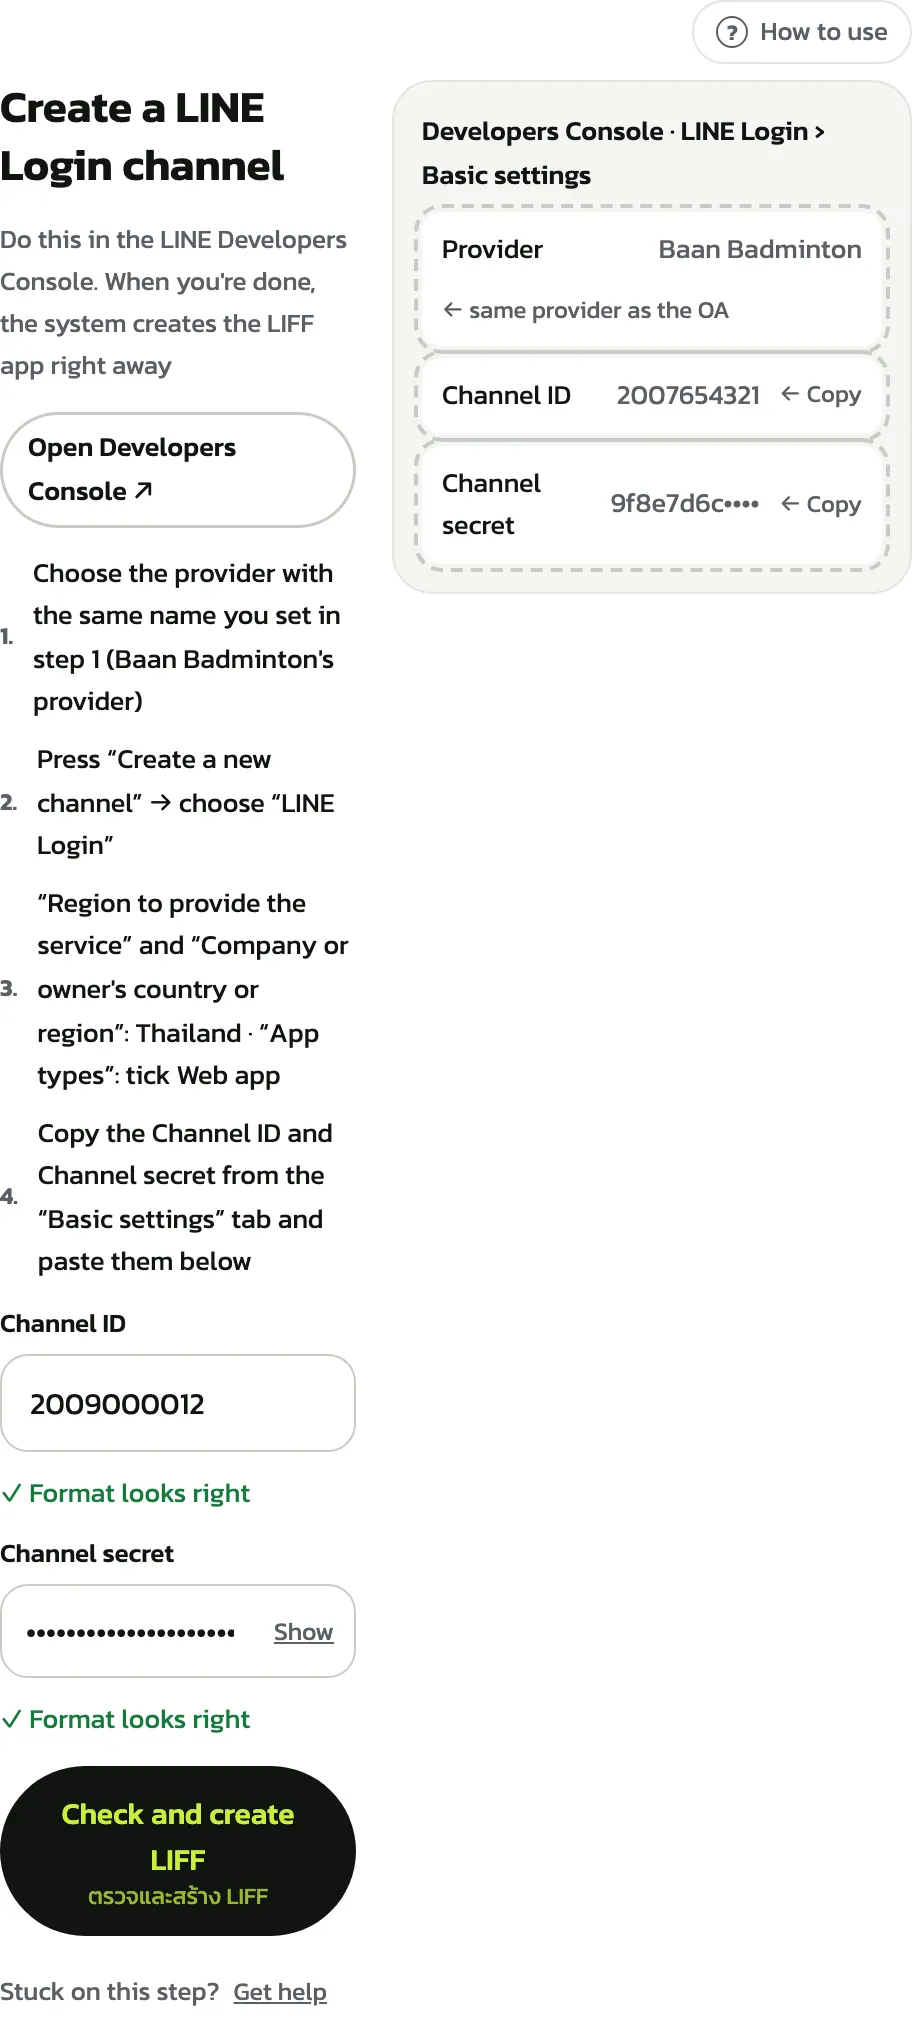
Tap “Open Developers Console ↗” and pick the provider with the name you gave when turning on Messaging API. The OA's Messaging API channel is already listed in it, with no LINE Login yet
It must be the OA's provider. In another provider, customers who log in aren't matched with the OA chat and the test step fails
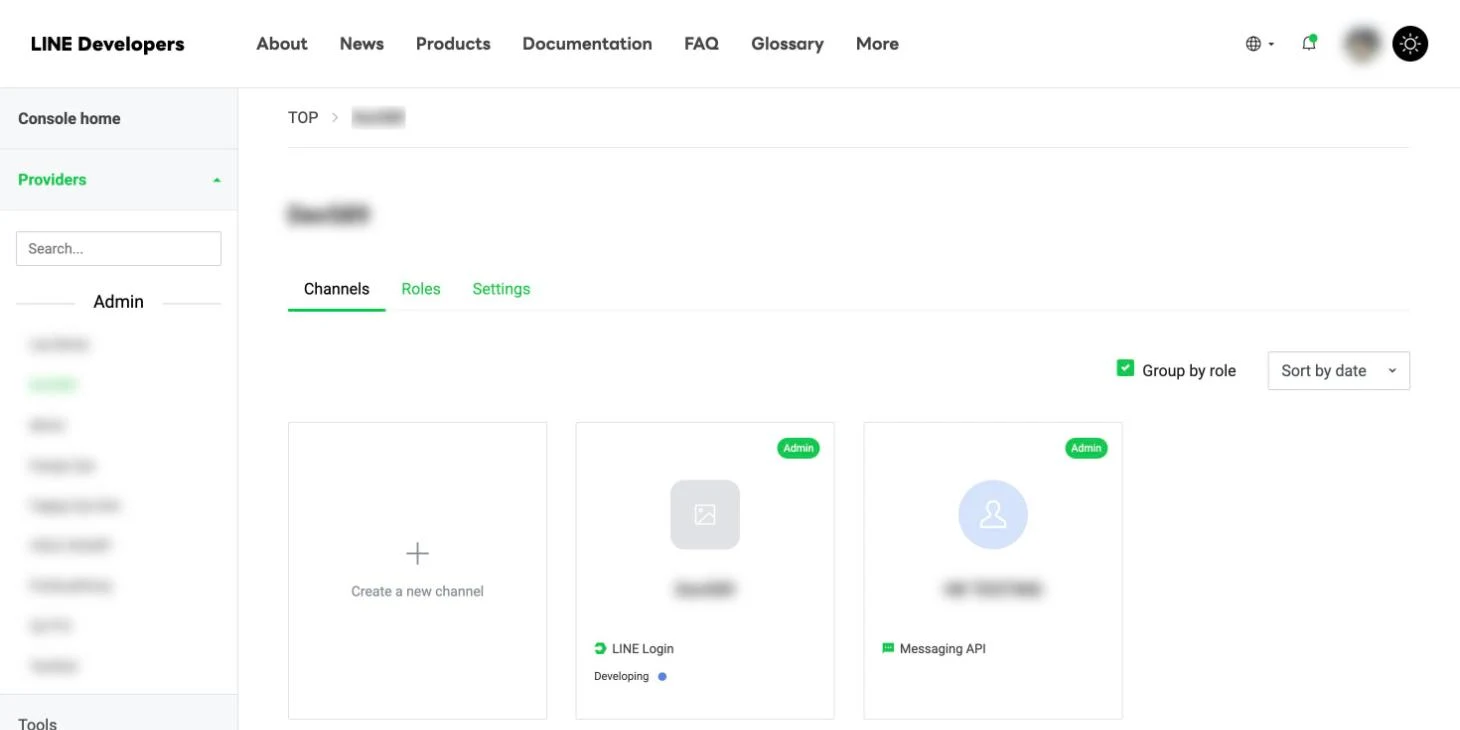
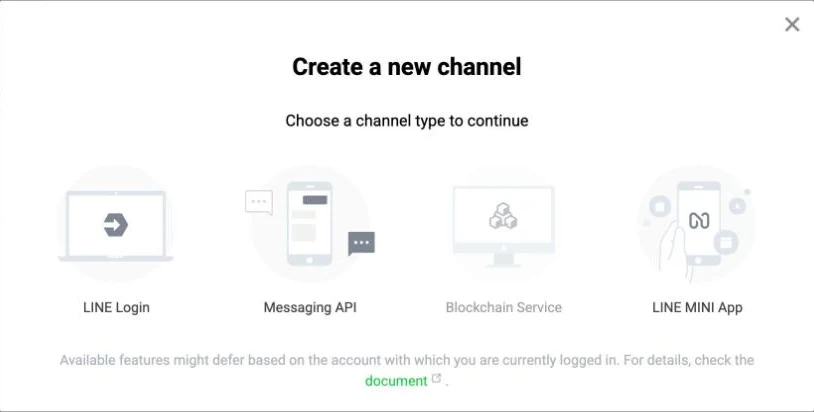
This account already has a LINE Login channel; yours will only have the Messaging API cardScreenshot of LINE's website, Tap “Create a new channel” and choose “LINE Login”
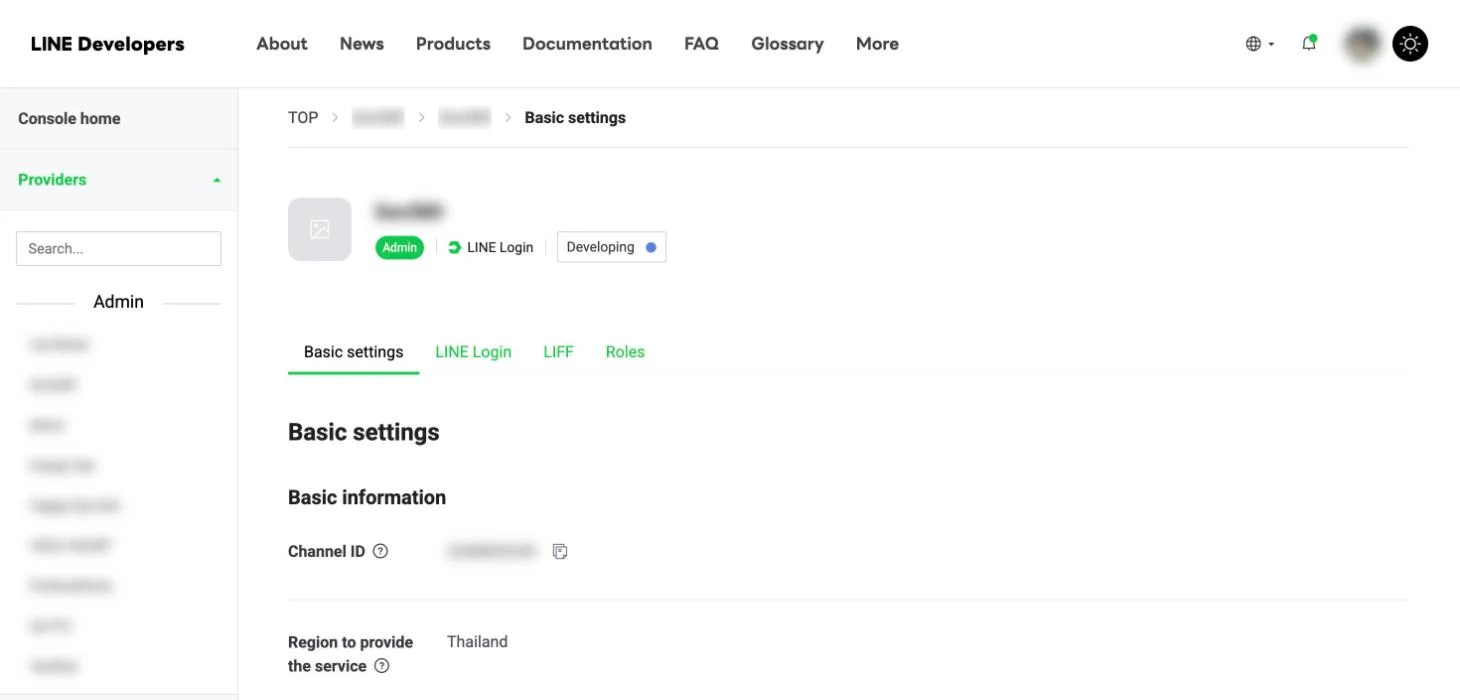
Screenshot of LINE's website, Set “Region to provide the service” to Thailand and “Company or owner's country or region” to Thailand
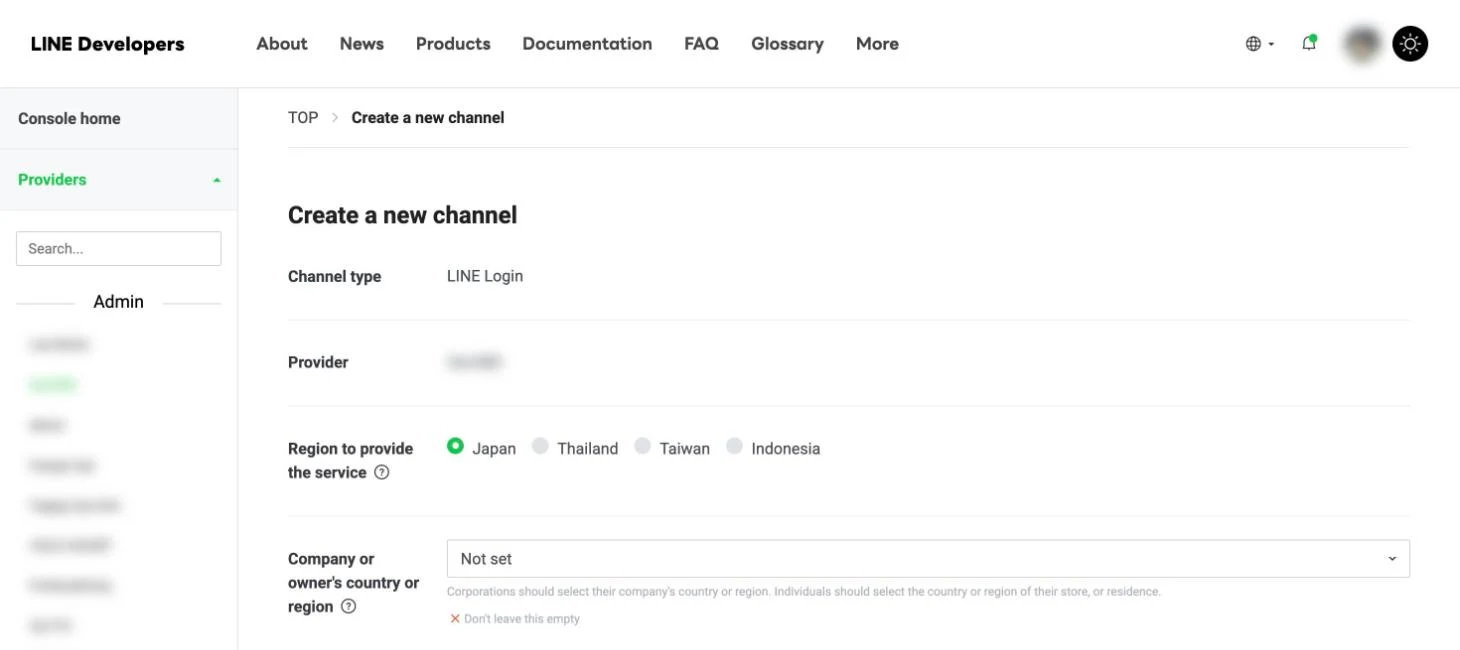
The form starts at Japan and Not set: change both to ThailandScreenshot of LINE's website, Under “App types” tick “Web app”, fill in Channel name, Channel description and Email address, tick every agreement the form asks for (with Thailand there is also the LY Corporation Privacy Policy) and create the channel
The Channel name can't contain the word LINE: your venue's name works
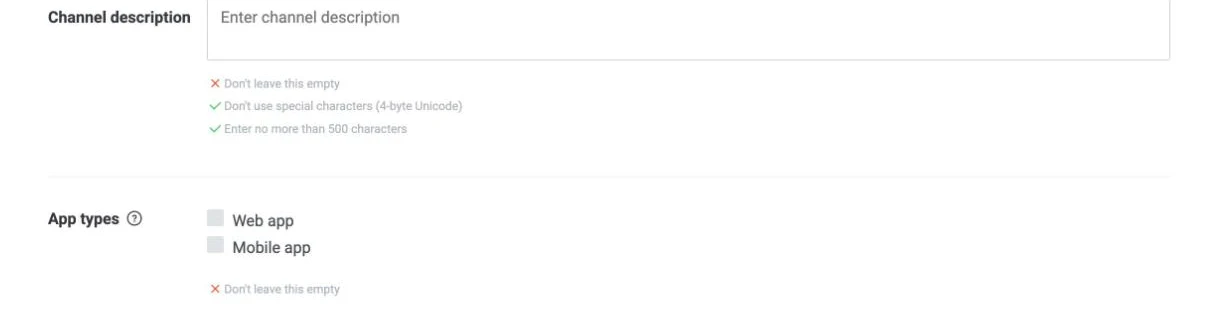
Screenshot of LINE's website, On the new channel's “Basic settings” tab, copy the “Channel ID” at the top
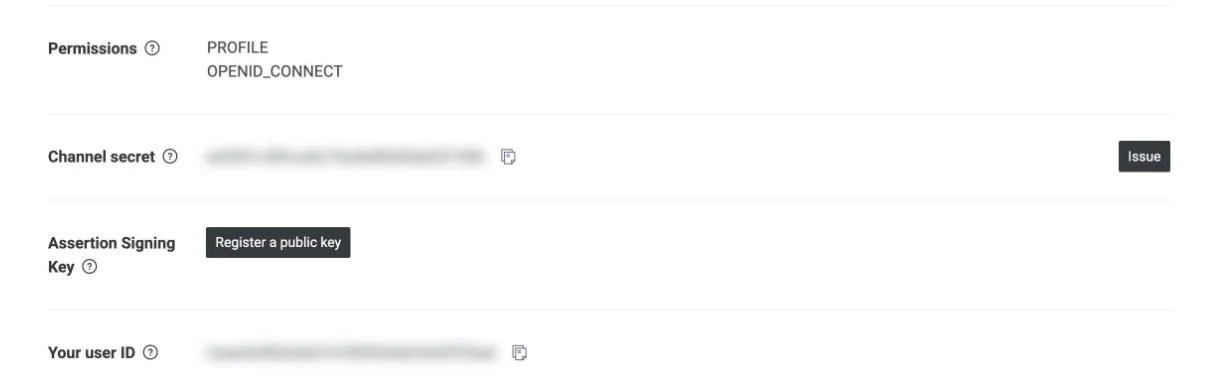
Screenshot of LINE's website, Scroll down and copy the “Channel secret” on the same page
Screenshot of LINE's website, Back on this page, paste them into “Channel ID” and “Channel secret” and tap “Check and create LIFF”. HOLD KOURT creates the LIFF app right away
4. “Set up LINE Login”
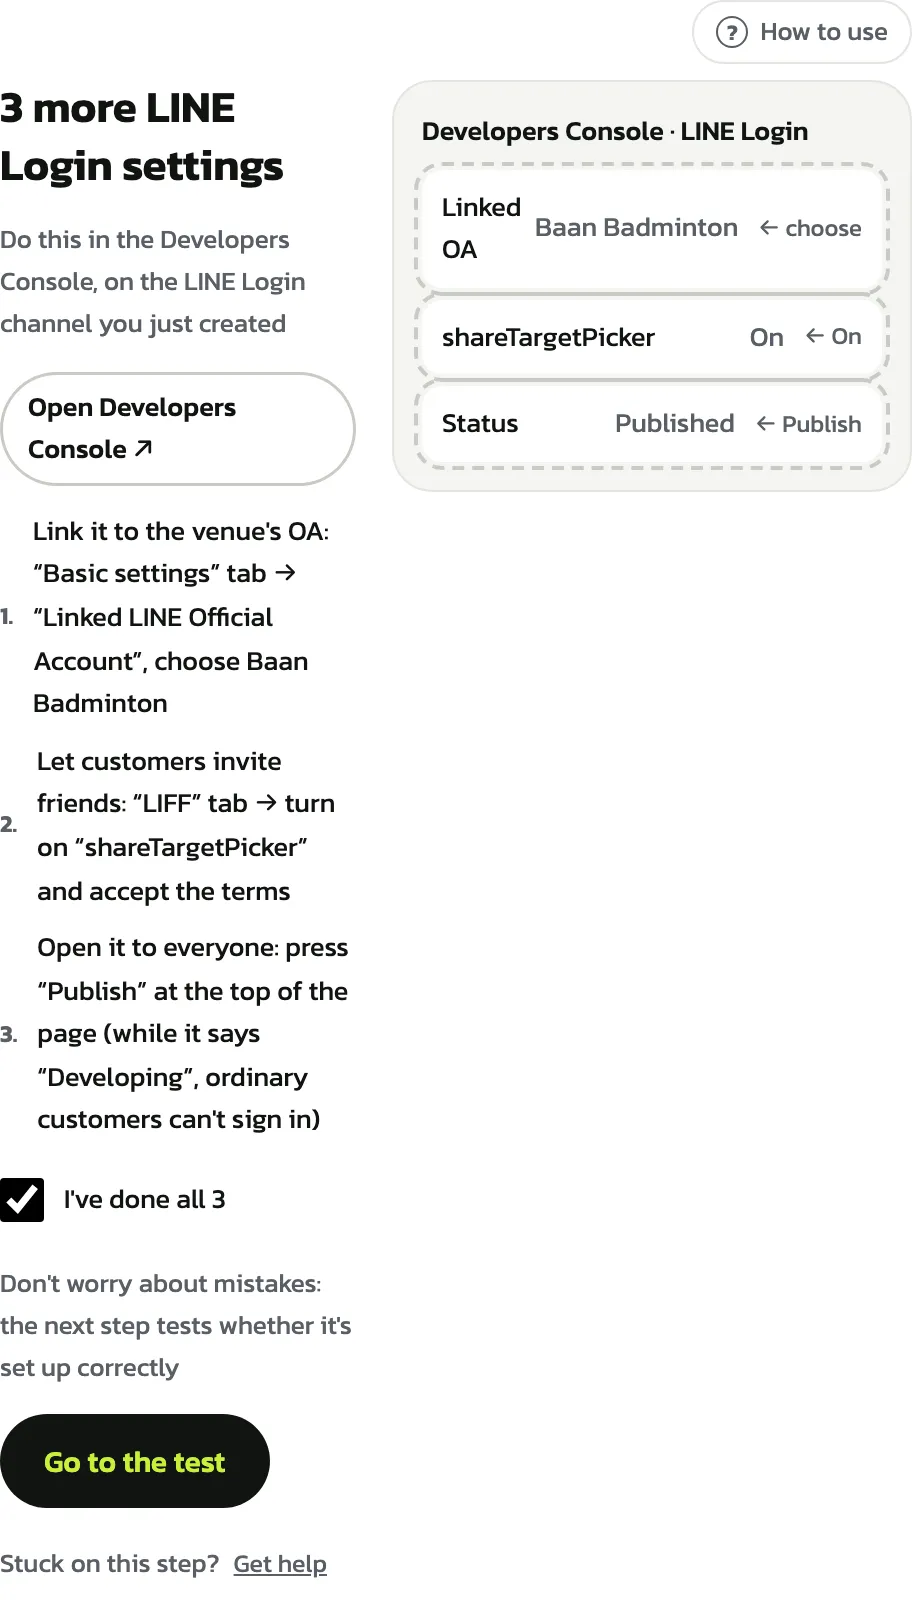
This step lists 3 settings to make in the Developers Console, on the LINE Login channel you just created.
Link it to the venue's OA: on the “Basic settings” tab, under “Add friend option”, find “Linked LINE Official Account”, tap “Edit” and choose the venue's OA. Once it is linked, customers are asked to add the OA when they log in, because the LIFF app HOLD KOURT created already has “Add friend option” set to On (aggressive), as the “LIFF” tab shows

Screenshot of LINE's website, Let customers invite friends: on the “LIFF” tab, turn on shareTargetPicker and accept its terms
Open it to everyone: tap the “Developing” badge at the top of the channel to publish it. While it says Developing, customers can't log in. The Basic settings picture in step 3 shows that badge next to LINE Login
Then tick “I've done all 3” and tap “Go to the test”. If one is missed, the test will tell you
5. “Test on your phone”
Scan the QR with the camera or LINE on the phone that sent the code in step 2. LINE may ask you to allow access to your profile and to add the OA as a friend: accept. The page on your computer updates by itself
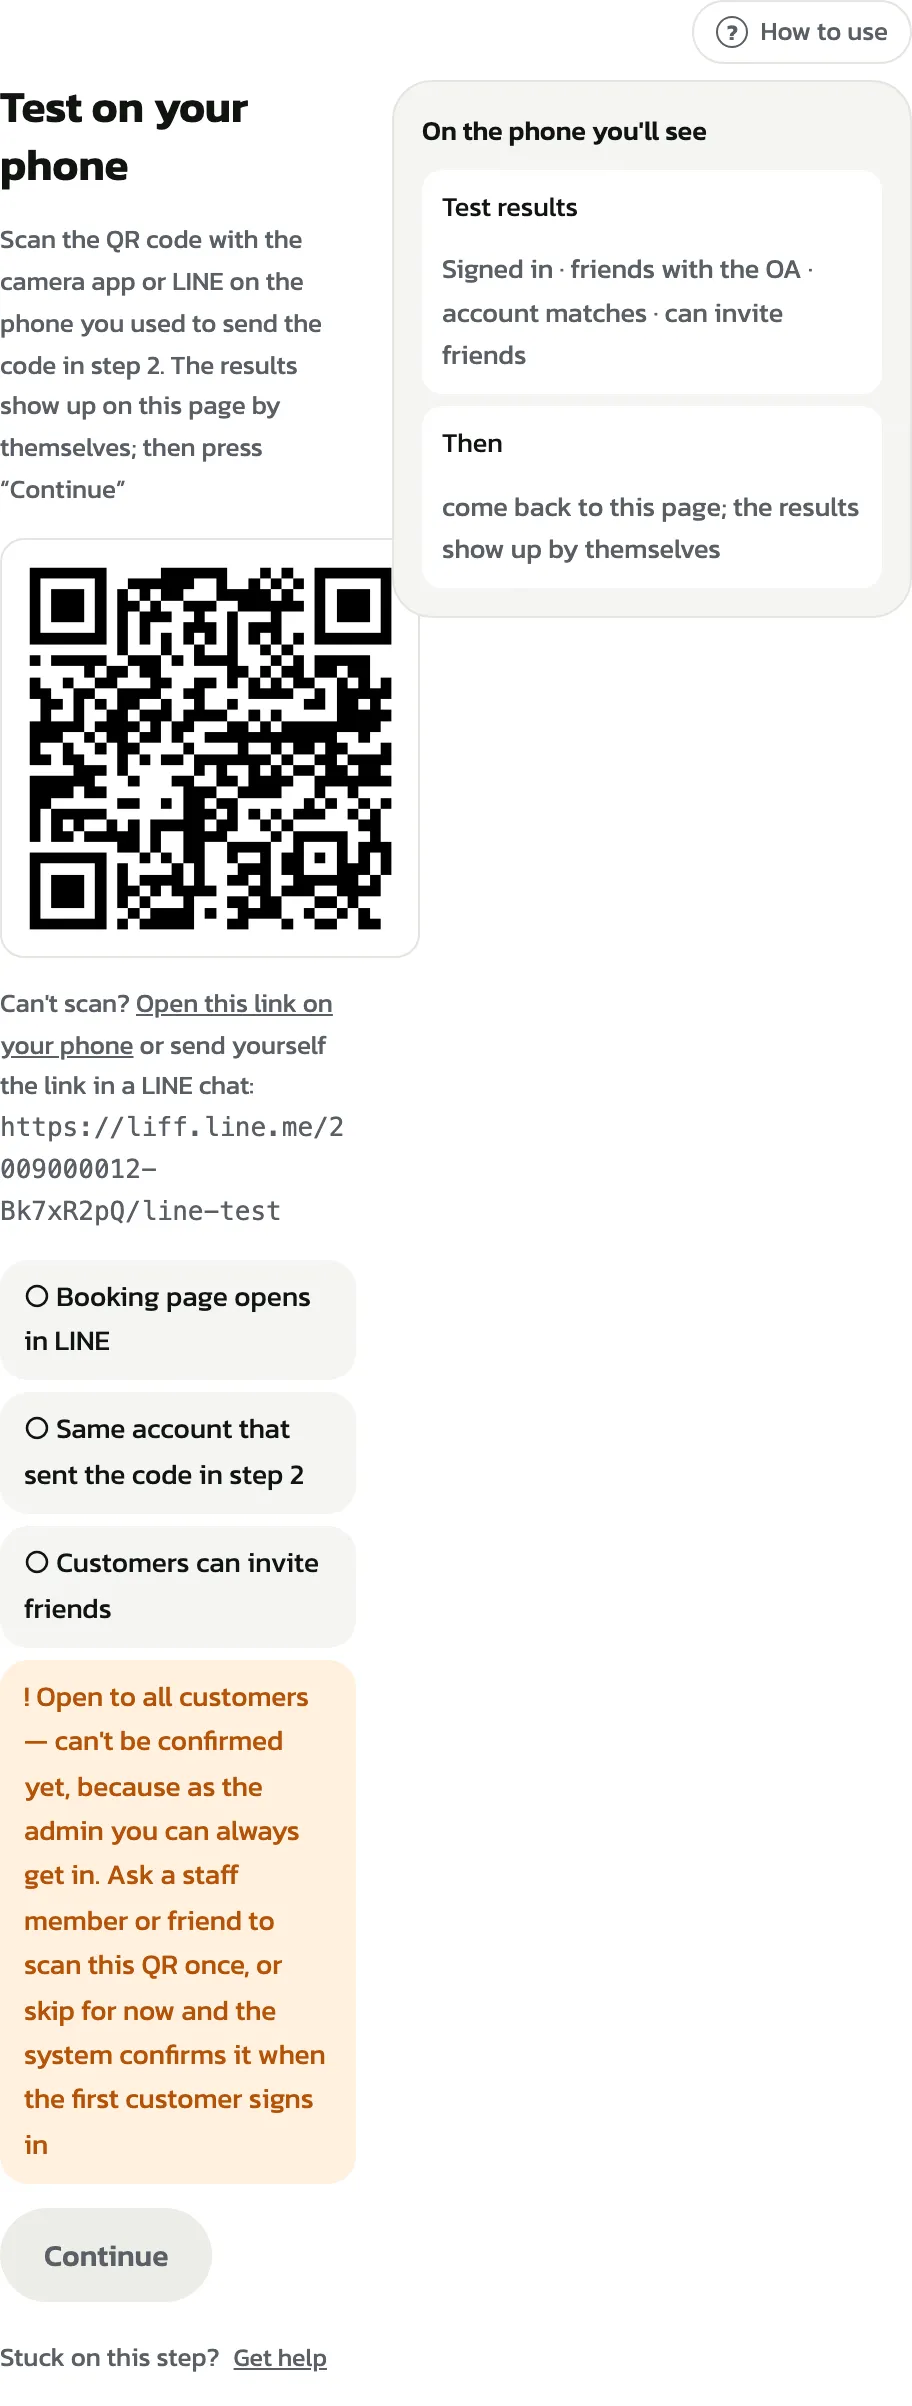
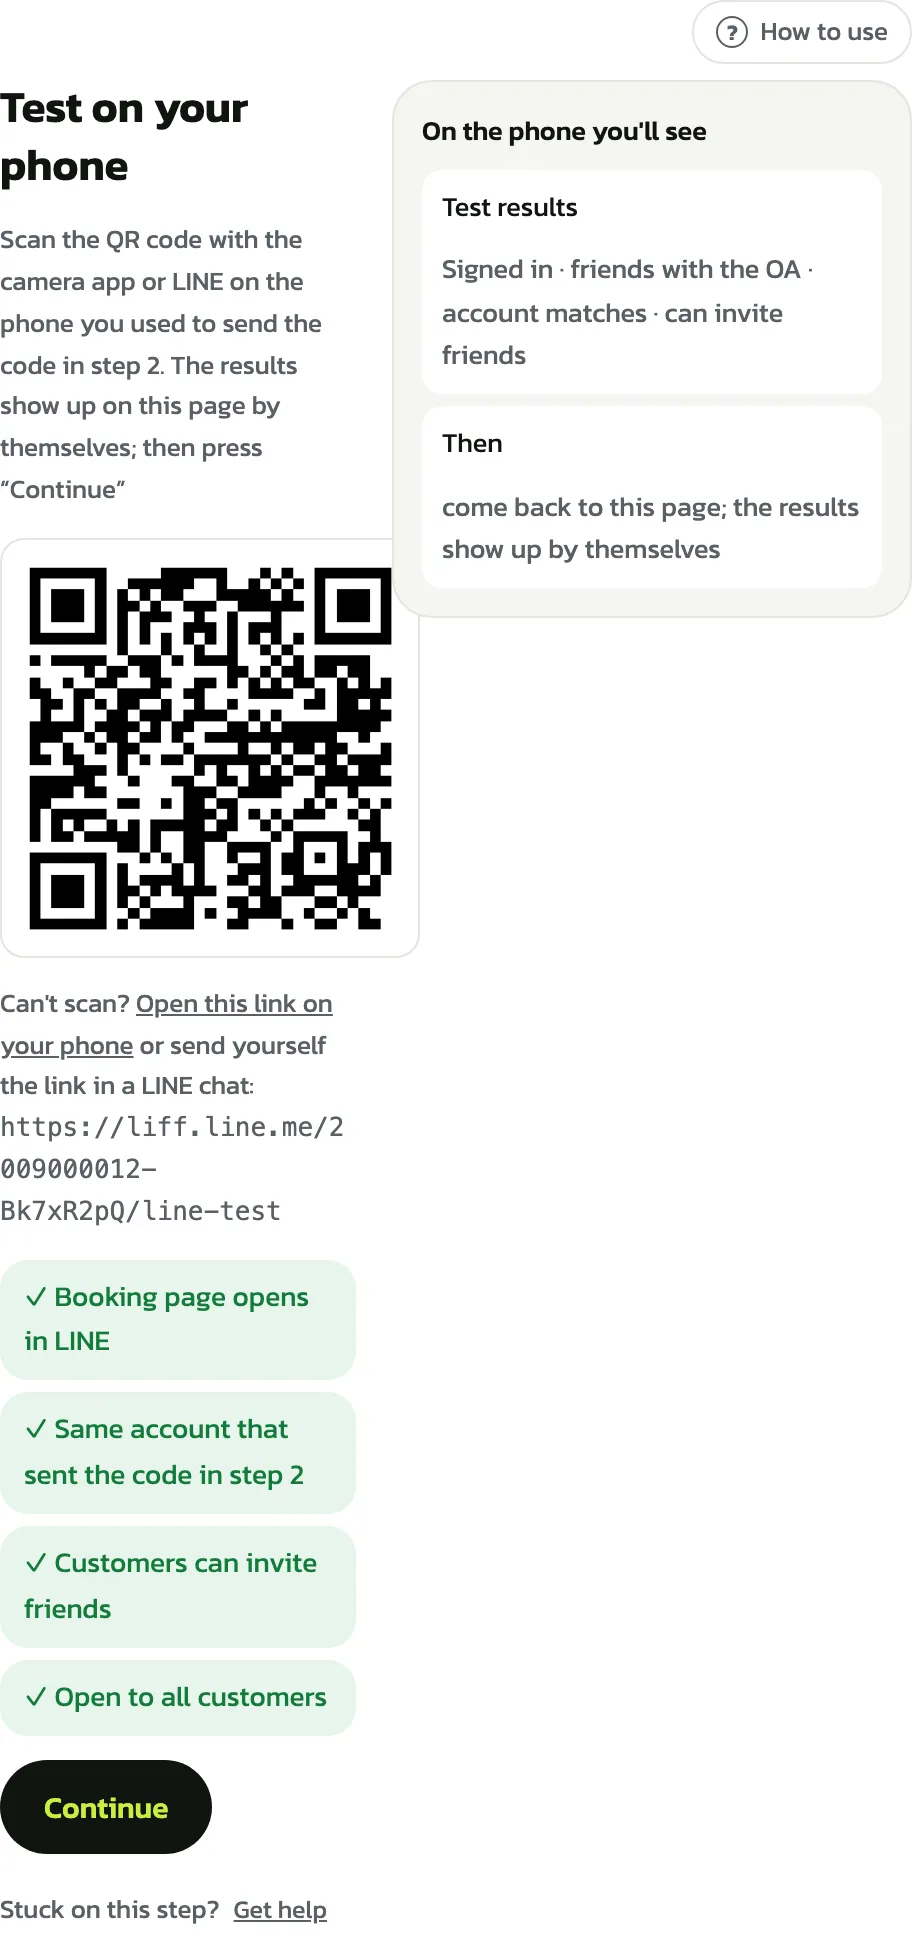
When it works you see “✓ Booking page opens in LINE”, “✓ Same account that sent the code in step 2” and “✓ Customers can invite friends”. Tap “Continue”
If the account doesn't match, LINE Login is in a different provider from the OA: create it again in step 3
“✓ Open to all customers” can't be confirmed from your own account, because admins can always log in. Have a staff member or a friend scan the QR once, or move on: it is confirmed when the first customer logs in
6. “Venue links”
“LINE is connected” shows the “Venue home page”, “Book a court” and “My bookings” links that open in LINE. “Copy” them into your greeting message, posts or chat menu, and “Download poster QR” for your counter
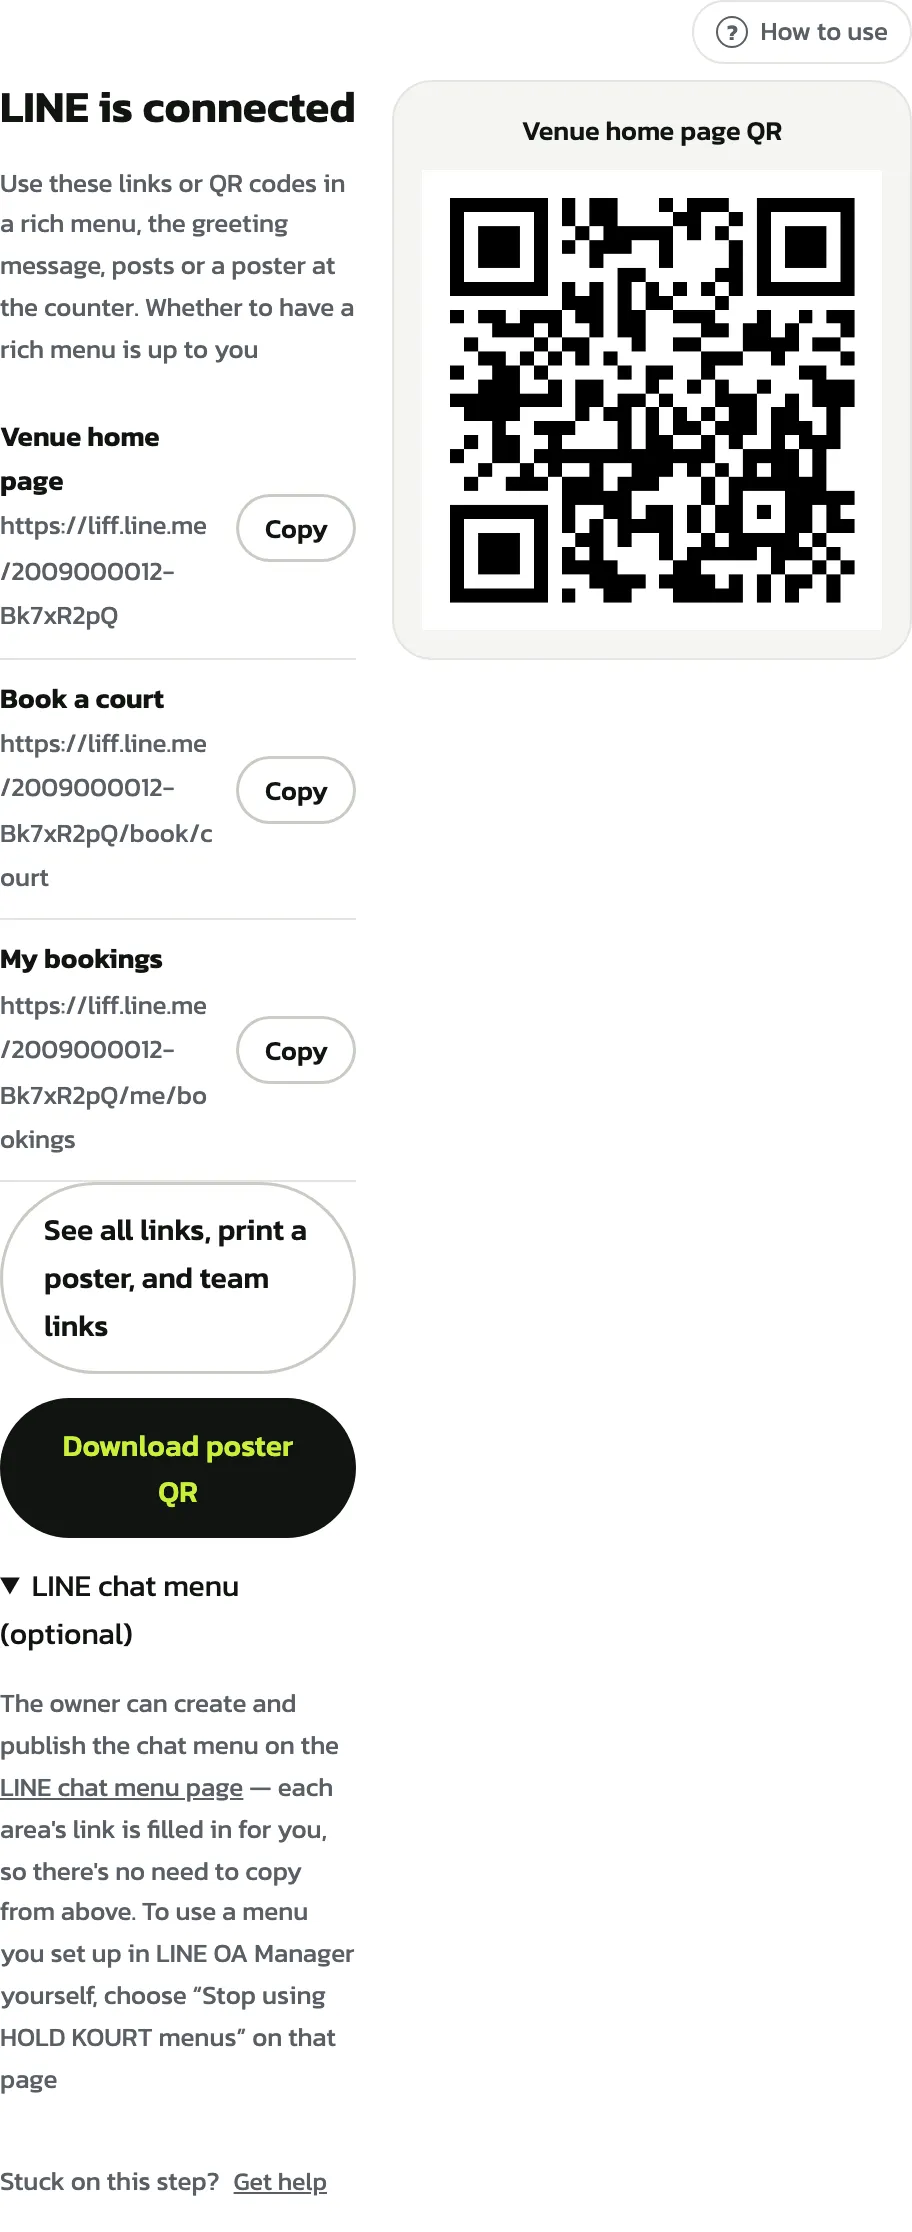
“See all links, print a poster, and team links” opens every link. A LINE chat menu is optional: make one on the “LINE chat menu page”
Stuck on a step
Every step has “Get help”: it sends the HOLD KOURT team the step you're on and the latest checks, never the Channel secret